
How to build multi-layered text-behind-object digital billboard countdowns

Updated: Aug 11
Dynamic countdowns are a simple way to create urgency around an event, product launch, grand opening, sports season, or special promotion. But a countdown does not have to look like a number simply placed on top of a static billboard.
With a little creative layering, you can make the dynamic countdown appear to sit behind a person, product, vehicle, mascot, or other foreground object.

This is often called a text-behind-object or text-behind-subject effect.
In this tutorial, we will build the effect using a football season kickoff countdown.
The basic technique is simple:
TOP LAYER: Transparent foreground object
MIDDLE LAYER: Dynamic countdown
BOTTOM LAYER: Original background artwork
Lucit's Template Designer supports multi-layer creative composition, including independent images, text, dynamic data, transparency, and control over which elements appear in front of or behind other elements. That makes this effect a great fit for dynamic digital billboard creative. (Lucit)
Learn more about Lucit's multi-layer creative capabilities here:
Watch the complete how-to video
The video below walks through this entire process inside the Lucit Template Designer.
How to build a multi-layered text-behind-object countdown billboard
You can use the two sample images included with this article to follow along with the video.
What we are building
For this example, we are creating a Football Season Kickoff Countdown in Lucit's Bulletin format.
Lucit's recommended design dimensions for the Bulletin format are 1400 × 400 pixels, covering screen aspect ratios from approximately 3.27:1 through 3.72:1. (Lucit)
You can see Lucit's complete list of supported formats and recommended design sizes here:
Sample Image 1: Original billboard artwork
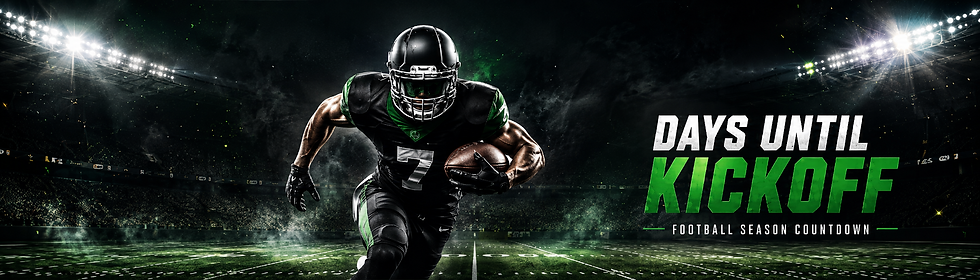
The original artwork contains the stadium, football player, lighting, and static supporting copy.
Notice that the player is already part of the original image.
That is fine.
We do not need to remove the player from the original background. Instead, we are going to place a second, perfectly aligned copy of the player over the dynamic countdown.
That is what creates the illusion that the countdown passes behind him.
Step 1: Create your original billboard concept
Start by designing your complete billboard in Photoshop, Canva, or your preferred design application.
At this stage, think about where your dynamic countdown will eventually appear.
You want the foreground subject to occupy an area where it can partially overlap the countdown.
For example, this effect can work extremely well with:
Athletes
People
Cars and trucks
Products
Food
Buildings
Mascots
Animals
Equipment
Large logos or graphic elements
In our football example, the player is positioned near the center of the billboard. This gives us room to place a very large countdown number partially behind him.
Lucit also has a dedicated guide to sports season opener campaigns, including automatically updating countdown campaigns leading up to kickoff or opening day. (Lucit)
Step 2: Create a transparent foreground layer
Next, create a second version of your artwork containing only the foreground object.
In our example, that means isolating the football player and removing everything around him.
Export this image as a transparent PNG.
Sample Image 2: Transparent foreground layer

This part is important: keep the full canvas size
Do not crop the transparent PNG tightly around the player.
If your original billboard artwork is:
1400 × 400 pixels
then your transparent player image should also be:
1400 × 400 pixels
Most of the PNG will simply be transparent.
The player should remain in exactly the same X/Y position as he occupies in the original artwork.
Why?
Because when both 1400 × 400 images are stretched across the Lucit template, the two copies of the player will line up perfectly.
You do not have to manually guess where the foreground object belongs.
This is probably the single most important part of making the technique easy to reproduce.
Removing the background in Adobe Photoshop
Adobe Photoshop includes a Remove Background Quick Action that can isolate a subject and create a transparent background or layer mask. Adobe also recommends manually refining the mask when needed for difficult edges such as hair or detailed objects. (Adobe Help Center)
Adobe's instructions are here:
After removing the background, keep the Photoshop document at the same canvas dimensions as your original billboard and export the entire canvas as a transparent PNG.
Do not trim away the transparent space.
Removing the background in Canva
Canva's Background Remover can also automatically isolate the subject of an image. (Canva)
Once you have isolated your foreground subject, place it on a Canva design that uses the exact same dimensions as the original billboard.
When downloading the design, choose PNG and enable Transparent background. Canva notes that transparent-background downloading is a premium feature. (Canva)
Again, export the entire canvas, including all of the transparent area surrounding the player.
Step 3: Create or open your Lucit template
Next, open the Lucit account where you want to build the creative.
Navigate to:
Templates → Create a New Template
Or open an existing template that you want to modify.
Lucit's Template Designer is the WYSIWYG editor used to create dynamic, responsive, data-driven digital out-of-home creatives. (Lucit)
If you are new to the designer, this guide covers the major panels and tools we will use throughout this tutorial:
Step 4: Upload the original background artwork
In the Elements Panel, expand Uploaded Assets.
Upload your original billboard artwork by clicking the upload control or simply dragging and dropping the image into Lucit.
Lucit's Template Designer supports both click-to-upload and drag-and-drop uploads. When uploading an image, you can choose to add it at its current size or stretch it to fill the screen. (Lucit)
For the background, choose:
Background to Stretch to Fill the Screen
Your original billboard artwork should now completely fill the canvas.
Step 5: Upload the transparent foreground PNG
Next, upload your transparent PNG containing the isolated player.
Add the image to the template and use Lucit's image sizing controls to:
Stretch to Fill Screen
Lucit's image tools include cropping and sizing controls such as No Cropping, Zoom to Fit, Stretch to Fill, and Stretch to Fill Screen. (Lucit)
Because the foreground PNG and original background artwork have the exact same canvas dimensions, the transparent player should line up directly over the player in the original image.
At this point, you may not see much of a visual difference.
That is a good sign.
It means the two images are aligned.
Step 6: Give your layers useful names
Open the Layers Panel.
Lucit allows you to rename layers by double-clicking the layer name, and layers can be dragged up or down to change their position in the layer stack. (Lucit)
Give the layers descriptive names such as:
Football Player - Foreground
Football Stadium - Background
We will add our countdown between these two layers next.
Naming layers may seem unnecessary on a simple three-layer creative, but it becomes very helpful as templates grow to include logos, dynamic fields, additional images, sponsor elements, and other content.
Step 7: Add the dynamic Countdown element
In the Elements Panel, expand the Text elements and add the Countdown element.
Lucit's Template Designer includes countdowns as one of its available text elements. (Lucit)

Right-click the countdown and choose:
Edit Settings

Configure the countdown for your event.
For a simple football season countdown, a good starting configuration is:
Target Date: Your kickoff date
Prefix: Blank
Suffix: Blank
Format Style: Daily No Label
Then style the countdown using the font, color, size, spacing, and positioning controls.
Step 8: Make the countdown BIG
This is where the design starts to become interesting.
Do not treat the countdown number like another small data field.
Treat it like a major graphic element.
If the countdown currently displays:
52
consider making those numbers large enough to occupy a substantial portion of the billboard.

Allow the number to overlap the player.
At first, the number will appear on top of the player.
That is exactly what we want.
We are going to fix that with the layer order.
Step 9: Sandwich the countdown between the two image layers
Open the Layers Panel again.
Arrange your layers in this order:
Top : Football Player - Foreground
Middle : Countdown
Bottom : Football Stadium - Background
This is the key to the entire effect.
Lucit's layer controls let you change the z-order of elements by dragging layers within the Layers Panel or using actions such as Send Backwards, Send to Back, Bring Forwards, and Bring to Front. (Lucit)
Once the countdown is placed between the original background and transparent foreground image, something interesting happens.
The countdown remains visible everywhere that the foreground PNG is transparent.
But wherever the number intersects the football player, the player covers it.
The dynamic number now appears to pass behind the player.

Why the text-behind-object effect works
The technique is actually very simple.
Your original artwork supplies the complete scene:
Background + player + lighting + static graphics
The dynamic countdown is placed over that complete image.
Then a perfectly aligned transparent copy of the player is placed over the countdown.
Think of the creative as three sheets stacked on top of one another:
Foreground PNG
↓
Dynamic countdown
↓
Original artwork
The transparent areas of the PNG allow the dynamic number to show through.
The opaque pixels belonging to the player cover the countdown.
Lucit's multi-layer composition system is specifically designed to allow backgrounds, text, logos, data elements, graphics, and transparent overlays to be controlled independently and placed at different z-order positions. Lucit's documentation also recommends transparent PNG files for overlay elements. (Lucit)
Step 10: Fine-tune the overlap
Now spend a few minutes adjusting the countdown's position and size.
You want enough of the number to pass behind the player that the layering is obvious, but not so much that the countdown becomes difficult to read.
For example, you might:
Hide part of a digit behind the player's shoulder
Let the helmet cover the top of a number
Allow the player's body to divide two large digits
Place a vehicle in front of the lower portion of the countdown
Put a product partially in front of oversized dynamic typography
The overlap is what creates the sense of depth.
Experiment with scale.
For this type of design, larger numbers will usually make the layered effect more noticeable than small countdown text.
Step 11: Preview different billboard formats
Your campaign may contain screens with different dimensions and aspect ratios.
Do not assume the composition that works perfectly at 1400 × 400 will automatically be ideal everywhere else.
Lucit allows one template to contain multiple Screen Formats and also provides an Each Size Independently Editor Mode so individual formats can be adjusted without affecting the others. (Lucit)
Once your primary version looks good, switch to:
Canvas → Editor Mode → Each Size Independently
Then check each additional format and adjust the countdown or artwork where needed.
Lucit's responsive design documentation recommends building the initial design first and then switching to Each Size Independently for format-specific adjustments. It also specifically recommends keeping elements such as people, logos, and text on separate layers when they should not be distorted. (Lucit)
Common problems and how to fix them
My foreground image does not line up with the background
The foreground PNG was probably cropped differently from the original artwork.
Make sure both files use the same full canvas dimensions.
If the background is 1400 × 400, the foreground PNG should also be 1400 × 400, with the subject remaining in exactly the same position.
I see a solid background around my foreground object
Make sure the isolated foreground was exported as a PNG with transparency.
Do not replace the transparent area with black, white, or another background color.
My countdown is appearing on top of the player
Your layer order is incorrect.
The transparent player layer must be above the countdown.
Remember:
Foreground
Countdown
Background
My countdown disappeared
The foreground object may be covering too much of the countdown.
Move or resize the countdown until enough of the number remains visible.
You want partial overlap, not complete obstruction.
The effect looks good on one billboard size but bad on another
Switch the Lucit Template Designer to Each Size Independently and fine-tune that Screen Format separately. (Lucit)
You are not limited to countdowns
Once you understand this technique, the element between your background and foreground layers does not have to be a countdown.
You could use the exact same approach with other dynamic content, such as:
Live sports scores
Prices
Temperatures
Product information
Location names
Event dates
Current inventory
Promotional messages
Other dynamic text or data
You can also create more complex compositions containing several foreground and background layers.
For example:
Foreground effects
Person or product
Dynamic data
Large dynamic headline
Secondary graphics
Background
Lucit's multi-layer system allows static brand artwork and independently updating dynamic elements to live within the same template. (Lucit)
The simple three-layer recipe
If you remember nothing else from this tutorial, remember these three layers:
1. Transparent foreground PNG
The subject you want to appear in front of the dynamic text.
2. Dynamic countdown
The number or other dynamic data you want to appear behind the subject.
3. Original background artwork
The complete static billboard design.
Then simply sandwich the dynamic countdown between the two images.
Because the foreground PNG contains transparency, the countdown shows everywhere except where the foreground subject covers it.
It is a simple technique, but it can make a dynamic billboard feel much more intentionally designed and turn a basic countdown into a major visual element of the creative.
Related Lucit documentation
Multi-Layer Creative Compositionhttps://lucit.app/docs/solutions/no-multi-layer-creative-support/
Template Designer General Navigation Guidehttps://lucit.app/docs/guides/template-designer-general-navigation-guide/
Digital Billboard Screen Format Referencehttps://lucit.app/docs/guides/screen-format-reference/
Sports Season Opener Billboard Campaignshttps://lucit.app/docs/use-cases/by-event/sports-season-openers/
Designing for Every Billboard Sizehttps://lucit.app/docs/solutions/designing-for-every-billboard-size/
Advanced Countdown Ad Guidehttps://lucit.app/docs/guides/how-tos/create-countdown-ad/
The advanced countdown guide is useful when you need custom JavaScript behavior, timezone handling, hours and minutes, custom messages after the countdown reaches zero, or more complex countdown logic. For the simple day-based countdown demonstrated in this tutorial, Lucit's built-in Countdown text element is the faster approach.

