HTML And CSS Layouts for Lucit Dynamic Templates
- Developer Support

- Jan 14, 2024
- 5 min read
Lucit Dynamic creatives are generated using HTML, CSS (and Javascript) in a responsive way to create the final image that will be rendered on the digital out-of-home screen.
We automatically turn the final rendered HTML into individual JPEG images that can work on any out-of-home screen. This is handled automatically by the Lucit Rendering Engine.
This means, that any digital screen that can display a JPEG, can display dynamic creatives from Lucit.

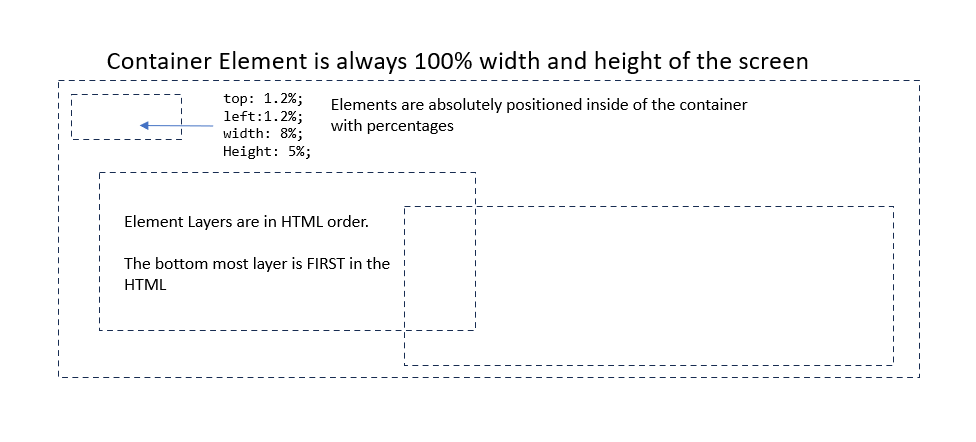
Widths, Heights and Positions
A key concept in the Lucit Template Designer is that heights, widths and absolution positions are based on percentages and not pixels.
The ensures that the templates are perfectly responsive to changing screens sizes (board formats)
All template content is contained with special container div that is fixed to exactly 100% height and width of the screen (using vw and vh CSS units)
Container
The basic HTML and CSS that make up the container looks like the following
As you can see by the styles applied to the html, body and the "container" element, the template will always be the same height as the screen it is targeted at.
Element Divs
Each element in the designer has a corresponding div in the HTML that is generated for it.
You can view the html for your template on the HTML tab of the code editor

Each element will fall into one of the following main types
Background | id is always "rectangle_default_bg" | Only one exists in a template and its primary purpose is to provide a background for the canvas to set a background color |
Text | A raw text element x-objectcode="text" | Can contain any amount of text |
Image | x-objectcode="asset_img" and data-value as well as the background style contains an image macro | Although not considered dynamic fields in the strictest sense, they do contain a macro that references the image object to display |
Shape | x-objectcode="{shape_id}" and normally contains an svg element as its first child | These are added with the Shapes tool |
Dynamic Text | Represents some dynamic text linked to an inventory item. x-objectcode="{macroid}" and data-value typically is a reference to the macro itself | Adding Dynamic Data elements generate these elements - such as Title or Price |
Dynamic Image | Similar to Dybamic Text except they render an image. | Adding dynamic images create these fields |
Background Element
This element is created by default and does NOT appear in the layers editor.
It is designed to provide a canvas for changing the background color. When organizing layers, this one will always be at the bottom
The HTML and CSS for this element looks like the following
In the Template Designer, the only control for this layer is the Background Color under Appearance on the Canvas Tab

Text Element
Text elements are added using the Text elements in the toolbar

The HTML in the Code Editor for these elements looks like the following
x-objectcode : Can be one of any of the text object codes. Common examples are text or paragraph
id : Randomly Generated and unique
class :
lc_dt_text required for all text type elements
lc_dt_text_editable allows you to edit the element inline
lc_format_fit_text auto sizes it to fit the box
Image Element
Image elements are added by uploading images in the toolbar

These elements use macros to identify the uploaded image on the template
These macros resolve to the url of the image
The HTML in the Code Editor for these elements looks like the following
x-objectcode : always asset_img
id : Unique id, always prefixed with img
class :
lc_dt_asset : Required on all uploaded images
lc_dt_image : Required on all uploaded images
lc_dt_image_center_contain : This is a example formatting class
data-value : This contains the image macro. It resolves to the actual image URL. The object is represented by the lcuid of the lucit image object
style : All images are rendered as backgrounds on the primary div
Shape Element
Shapes are HTML objects, normally SVG's that are added to your template using the Shapes section in the toolbar

When adding a shape, the resulting HTML will look something like the following
x-objectcode : The code representing this particular shape
id : A uniqe id for this element
class :
lc_dt_object - All shapes have this
lc_dt_object_svg - If the object is an svg.
The div content itself, then contains the HTML shape code. Note the svg element for a square in the example
Important : svg should have width and height at 100% and pointer-events set to none
Dynamic Text Element
Dynamic text elements are linked to macros and are added using the Dynamic Data Elements section in the toolbar

When adding these elements, the HTML will look something like the following
x-objectcode : An id representing the dynamic element
id : Unique id, always prefixed with data_source_text
class :
lc_dt_data : Required on all dynamic elements
lc_dt_text : Required on all text elements
x-placeholder : Text that is displayed to the user when the macro has not resolved to a value - Used in previews and when posting. This value is set by the Placeholder Helper text in the Object Settings for the element
x-fieldname : When prompting for this value, templates will use this name
data-value : This contains the field macro that resolves to this value. See the macro reference
Dynamic Image Element
Dynamic image elements are similar to Dynamic Text elements except that they render as a data connected image to the underlying data object
Dynamic image elements are added using the Dynamic Data Elements in the toolbar and are identified by the small image squares next to each one

When adding these elements, the HTML will look something like the following
x-objectcode : An id representing the dynamic element
id : Unique id, always prefixed with data_source_img
class :
lc_dt_data : Required on all dynamic elements
lc_dt_image : Required on all image elements
x-placeholder : The url to the image that will be used a placeholder. This can be changed in the Object Settings dialog Edit Placeholder Image
x-fieldname : When prompting for this image, templates will use this name
style : Image elements render using the css background-image property of the element
data-value : This contains the field macro that resolves to this image. See the macro reference
Classes Reference
Classes are used for 2 primary purposes:
Tagging
Formatting
Tagging classes are just used to identify elements of a specific type and do not provide any visual formatting.
Formatting classes, add built in standard formatting.
Tagging Classes
lc_ut_designer | All elements have this class. This identifies the element as part of the layer structure in the template |
lc_dt_object | Represents an object (for example, a shape) |
lc_dt_object_svg | An svg object. |
lc_dt_element | Indicates a non-data connected element |
lc_dt_data | An element that is connected to data |
lc_dt_image | All image elements (static or dynamic) |
lc_dt_asset | A static uploaded asset (usually an image) |
lc_dt_text | A text element - Static or Dynamic |
lc_dt_data_function | The data-value is actually a custom field function |
lc_dt_text_editable | If a text field has this, you can edit it in the designer by double-clicking on it |
Formatting Classes
lc_dt_default_background | Applied to the background element |
lc_dt_image_center_cover | Center and fill the image to the box |
lc_dt_image_full_size_stretch | Stretch and Fill the image to the width and height of the screen. |
lc_dt_image_center_contain | Center but do not crop the element in the box |
lc_format_fit_text | Shrink or Grow the text in the box. This is applied when Font Size is set to "Auto" |
lc_format_text_none | No special formatting |
lc_format_price_us | Format a price as US dollars |
lc_format_price_short_us | Short - like $10K |
lc_format_price_short_us_no_decimal_round_downK | Round down without decimals |
lc_format_price_super_script_us | Put the cents in superscript |
lc_format_phone_nanp | standard nanp format |
lc_format_phone_nanp_hyphen | Uses hyphens only |
lc_format_degrees | Adds a degree symbol for temperature |
lc_format_phone_nanp_dots | Uses dots |
Element CSS
When using the Lucit Template Designer, most operations either add/remove classes, or, directly edit the CSS
Here is an example of the css for a text element
Note the use of percentages for positioning and size.
The remaining css styles are all industry standard. The rendering engine is based on Chrome so any CSS styles supported by chrome will parse and render correctly
All CSS for the template is available in the CSS tab of the code editor

Independent Edit Mode
By default, your template is on "All Sizes" mode which means that all CSS changes are applied to all sizes of your template
See Screen Format Reference for more information on Lucit Screen Formats
This is the recommended mode to start with when you first start building your template
Once you begin to need to create changes on individual sizes of your template, you will then switch you template into independent mode by selecting "Each Size Independently" on the Canvas Tab -> Editor Mode section

When this happens you get the following message
Warning, changing to Individual Editor mode will enter a mode where you can edit each size independently. All changes will only apply to each size and this is NOT REVERSABLE. If you switch back to Global Editor mode, you will lose individual editor mode changes you have made.
Once you hit ok, you can now edit each size, independent of the other sizes.
Under the hood, the template designer copies all of the css for the elements into CSS Media Queries that match each size
Here is an example for 3 different screen sizes
Each size variant has it's own set of media queries, and now, when you edit the elements in the designer, only the appropriate size change.
This setting does, however, introduce the following limitation :
You cannot edit the global CSS anymore.
When you open it in the code editor, you will be greeted with the following message, and the CSS section is greyed out
You are in individual edit mode. Changes to HTML and CSS will not function as expected. HTML and Javascript Changes are global and will affect ALL sizes, GLobal CSS Changes are disabled, Use the right-click "Edit CSS" menu on each individual element to edit the CSS for each element

In order to access the underlying CSS for the element, you will need to right-click on it, and choose "Edit CSS / HTML"


Conclusion
Under the hood, the Lucit Template Designer is completely customizable, not just through the HTML and CSS discussed here, but with custom functions and custom formatting functions.


